 how-to
Why Do Pest Infestations Keep Returning? Fix It for Good
Table of Contents
- Why Pest Infestations Keep Coming Back After Treatment
- The Source Was Never Treated
- Wrong Product or Wrong Method for the Pest
- How to Seal Entry Points for Pests
- Your Pest Proofing Your Home Checklist
- Why Do Woodworm Return to Antique Furniture?
- When DIY Fails: Signs You Need a Professional
- How Professional Treatment Breaks the Cycle
- Frequently Asked Questions
Last Updated: 15 September 2026
Why Pest Infestations Keep Coming Back After Treatment
Most pest infestations keep returning because the treatment only addressed the visible problem, not the source. Killing the pests you can see is the easy part. Finding out why they came inside in the first place is where most DIY attempts fall short.
At ProPest Oxford Ltd, we see this pattern constantly: a homeowner sprays, the activity stops for a few weeks, then it starts again. The reason is almost always one of two things: the nest or breeding site was never reached, or the entry route stayed open.
Understanding why pest infestations keep returning is the difference between a temporary fix and a permanent one. Below, we break down the two most common causes, then give you a practical checklist for sealing your home properly.
A common mistake is assuming that no visible activity means the problem is solved. Rodents, insects, and woodborers often retreat deeper into wall cavities, lofts, or subfloor voids after surface treatment, then re-emerge once the residual effect fades.
The Source Was Never Treated
Pest infestations keep returning when the nest, harbourage, or breeding site survives the initial treatment. Spraying along skirting boards kills the pests that cross that line. It does nothing to the colony living behind your kitchen units or inside a wall void.
Many businesses and homeowners find that the visible trail of activity is a symptom, not the source. Ants, for example, follow pheromone trails back to a nest that may sit under a patio or inside a cavity wall. Treat the trail and the colony simply reroutes. Rats are similar: poisoning one animal does nothing if a harbourage under a shed or in a loft insulation roll remains undisturbed.
The practical fix is to trace activity back to its origin before treating anything. Look for droppings, grease marks, gnawed materials, and nesting debris, and follow them to the point where they stop. That stopping point is usually the source.
Wrong Product or Wrong Method for the Pest
Using the wrong product for the species you actually have guarantees a repeat infestation. Rodenticides do nothing for insects, and general-purpose insect sprays often fail against woodborers, carpet beetles, or cluster flies because the active ingredient and application method do not match the pest's biology.
Identification comes first. A common mistake is buying a treatment based on what the problem looks like rather than what it is. What looks like ant activity in a kitchen may be pharaoh ants, which require a completely different baiting approach to avoid colony splitting.
Method matters as much as product. Gels, baits, dusts, and residual sprays each suit different species and different harbourages. A bait placed where the pest will not travel is wasted. A dust applied in a damp void will clump and stop working.
If you are unsure what you are dealing with, get it identified before you spend money on treatment. British Pest Control Association guidance on identifying common pests is a useful starting point for matching pest to method.
How to Seal Entry Points for Pests
Sealing entry points stops new pests entering, which is essential because even a perfect treatment cannot prevent reinvasion through an open gap. The aim is to close every route a pest could use to get from outside to inside, then check the work seasonally.
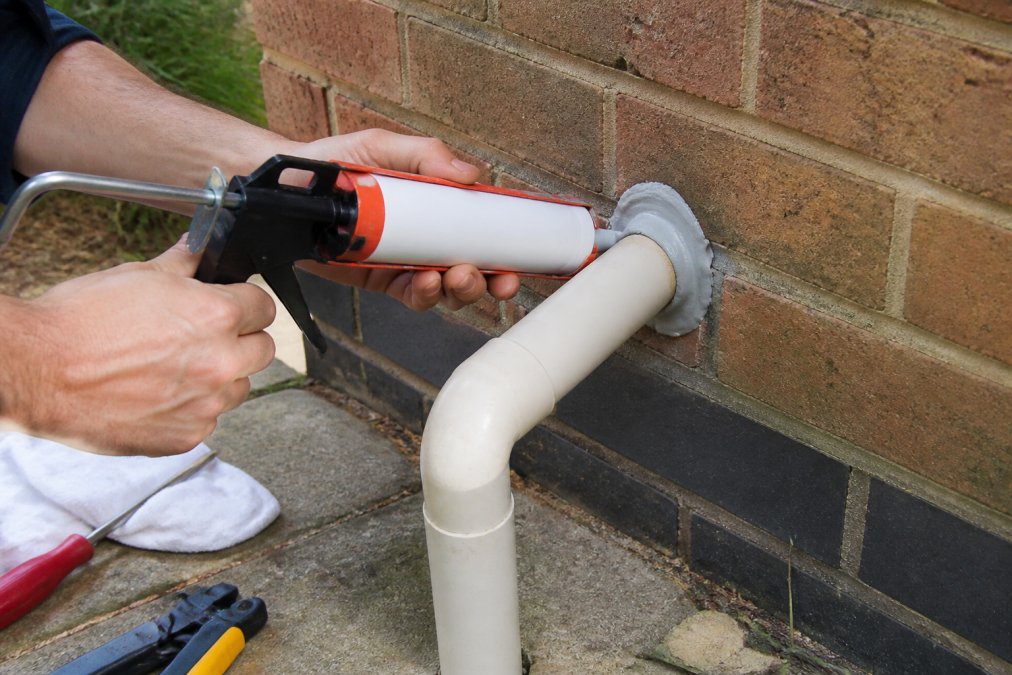
Start with the obvious: gaps around pipework, cables, and vents. These are the most overlooked because they are small and often hidden behind units or in cupboards. A gap the width of a pencil is enough for a mouse.
Then work outward. Check air bricks and replace broken ones with rodent-proof covers. Inspect roof spaces for gaps at the eaves and around fascia boards. Look at door thresholds, garage doors, and any point where services enter the building.
The Gaps Most People Miss
The gaps that cause the most repeat problems are rarely the ones you can see from the ground.
- The gap behind kitchen units where pipes pass through the wall
- Broken or missing air brick covers at low level
- Gaps around waste pipes under sinks
- Openings at the eaves and soffits
- Utility entry points for gas, water, and broadband cables
Each of these gives pests a route straight into a wall void. Seal them with the right material for the gap: wire wool and sealant for small gaps around pipes, mortar or cement for larger masonry openings, and brush strips or seals for door thresholds.
Your Pest Proofing Your Home Checklist
A pest-proofing your home checklist turns a one-off job into a routine you can repeat each season. Work through it twice a year, and again after any building work or plumbing repair.
- Walk the exterior walls and note every gap, crack, or hole larger than a pencil width
- Check pipe, cable, and vent entry points and seal any that are open
- Confirm air bricks are intact and fitted with rodent-proof covers
- Inspect the roof space for gaps at the eaves and around fascia boards
- Fit brush seals or draught excluders to external door thresholds
- Clear clutter from lofts, garages, and under-sink cupboards that could harbour pests
- Store food, pet food, and bird seed in sealed containers
- Fix any dripping taps or leaks, since damp attracts pests
- Trim vegetation back from walls and rooflines
- Check waste bins have tight-fitting lids
| Problem | Fix | Why It Works |
|---|---|---|
| Gaps around pipes | Wire wool plus sealant | Blocks the most common mouse route |
| Broken air bricks | Rodent-proof cover | Keeps vents functional but sealed |
| Open eaves | Mesh or mortar repair | Closes loft access points |
| Door thresholds | Brush seal | Stops pests walking in at floor level |
| Clutter in voids | Clear and inspect | Removes harbourage and nesting sites |
Why Do Woodworm Return to Antique Furniture?
Woodworm return to antique furniture when the conditions that attracted the beetles in the first place are still present. Damp timber is the main driver. Adult beetles lay eggs in wood with higher moisture content, and larvae tunnel through it for years before emerging as adults to repeat the cycle.
This is why treating the visible holes alone rarely works. The flight holes you see are exit points from larvae that have already left. If the timber stays damp and the surface is left untreated, a new generation will move in.
Antique pieces are particularly vulnerable because they often sit in unheated rooms, against cold external walls, or in outbuildings. The fix combines treatment of the timber with drying the environment. Improve ventilation, address any source of damp, and treat the wood with an appropriate product. For pieces of value, get advice before applying anything, as the wrong treatment can affect patina and worth. Historic England guidance on caring for historic timber covers how to approach treatment on older pieces.
When DIY Fails: Signs You Need a Professional
Call a professional when activity continues after two rounds of correctly applied DIY treatment, when you cannot find the source, or when the species involved carries health or structural risk. Rats, wasps, bed bugs, and wood-boring insects all reach a point where home treatment stops being cost-effective.
Watch for these signs:
- Fresh droppings or gnaw marks appearing after treatment
- New damage to timber, wiring, or stored goods
- Scratching or movement noises at night that persist
- A smell of decay or ammonia in a wall void or loft
- Repeated sightings of the same species in different rooms
If you are a landlord, hospitality operator, or manage a large property, the threshold for calling in help is lower.
How Professional Treatment Breaks the Cycle
Frequently Asked Questions
Why do pests return after professional treatment?
Pests return after professional treatment when the source of the infestation was not fully addressed. If entry points remain open, or if nesting sites and food sources are still accessible, new pests will move in. Some treatments also miss eggs or larvae hidden deep in wall cavities or under floors. A thorough survey that identifies how pests are getting in and where they are living is essential to stopping pest infestations from returning.
How can I prevent pests from entering my home again?
Seal gaps around pipes, cables and vents with wire wool and sealant. Repair cracked tiles and damaged brickwork. Keep external bins lidded and stored away from walls. Trim vegetation back from the building. Fix dripping taps and clear gutters. These steps remove the three things pests need: entry, food and water. A pest-proofing your home checklist helps you work through each area systematically rather than guessing where the problem is.
Does a clean house guarantee no pests?
No. Cleanliness reduces food and harbourage, but it does not seal entry points or remove moisture that attracts pests. Rodents can enter through gaps as small as a pencil width, and woodworm larvae can remain inside timber for years regardless of how tidy a room is. Properties with older construction, cellars or attached outbuildings are especially vulnerable. Hygiene and proofing work together; neither alone is enough.
What should I do if a pest infestation persists after treatment?
If an infestation persists after treatment, contact the company that carried out the work and ask them to re-inspect. They should check whether the original source was correctly identified and whether new activity has appeared elsewhere. Ask for a written report showing what was found and treated. If the problem keeps returning, a fresh survey by an RSPH-qualified technician will usually reveal an entry point or harbourage that was missed.